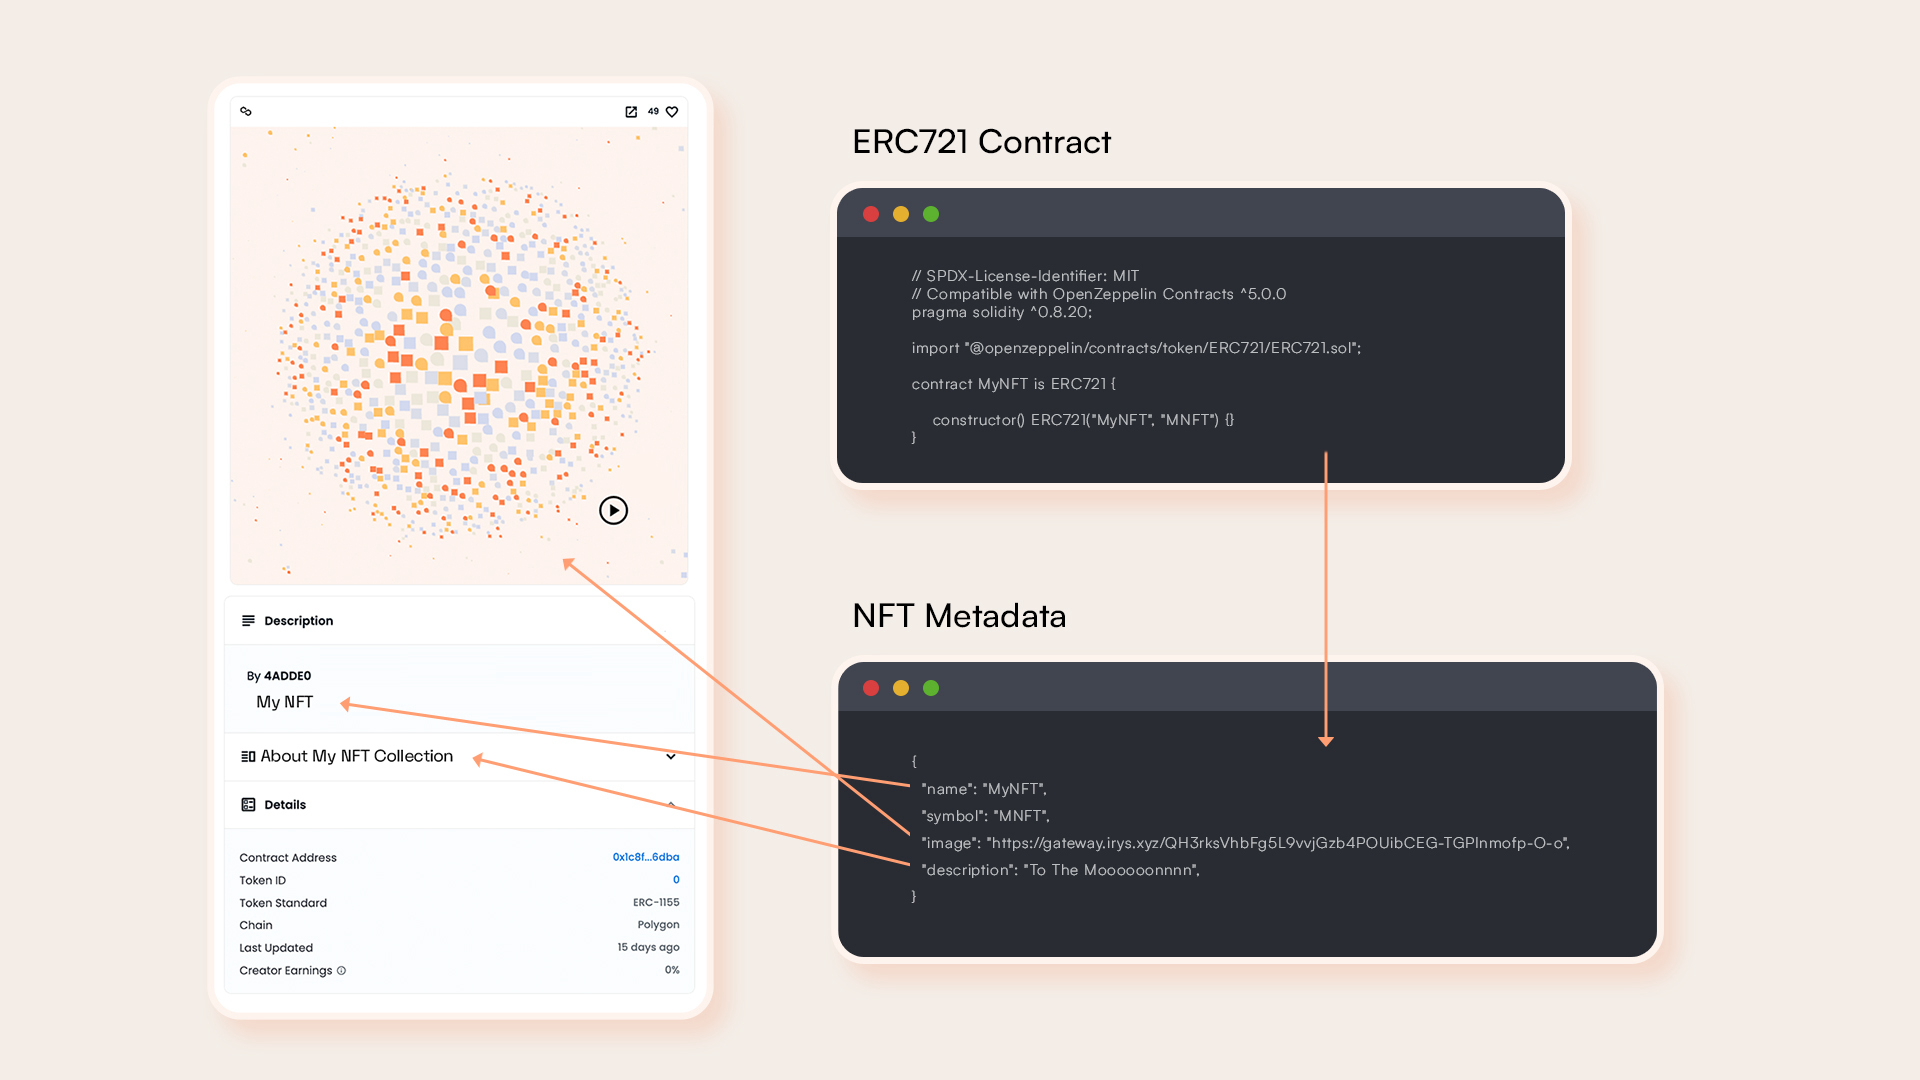
When you use Irys to store NFT assets, you’re guaranteed your NFT will be both permanent and immutable. Here’s how you do it.

There are three parts to an NFT:
- Smart contract
- NFT metadata
- NFT assets
The smart contract stores a pointer to the NFT metadata, and then the NFT metadata contains links to the NFT assets.
In the example above, there is a name and description that are shown on platforms like Opensea when the NFT is viewed. The image parameter points to a static image of the NFT. You can also add an optional animation_url that points to a video, song, or HTML animation file.
Three steps to creating an NFT:
- Upload your assets to Irys.
- Embed the URLs to the assets in NFT metadata.
- Upload metadata to Irys.
- Use the metadata URL to mint your NFT.
After installing the Irys SDK, upload your assets with:
Use a token-specific version of getIrysUploader() to connect to an Irys Bundler before uploading. Choose one from here.
import * as fs from "fs";

const uploadImage = async () => {
	const irys = await getIrysUploader();
	const fileToUpload = "./myNFT.png";

	// Get size of file
	const { size } = await fs.promises.stat(fileToUpload);
	// Get cost to upload "size" bytes
	const price = await irys.getPrice(size);
	console.log(`Uploading ${size} bytes costs ${irys.utils.fromAtomic(price)} ${token}`);
	await irys.fund(price);

	// Upload metadata
	try {
		const response = await irys.uploadFile(fileToUpload);
		console.log(`File uploaded ==> https://gateway.irys.xyz/${response.id}`);
	} catch (e) {
		console.log("Error uploading file ", e);
	}
};
Alternatively, you can upload using our Storage CLI.
irys upload myNFT.png \
  -n devnet \
  -t ethereum \
  -w bf20......c9885307 \
  --tags Content-Type image/png \
  --provider-url https://rpc.sepolia.dev
Embed the URLs generated from the above into your NFT metadata.
{
	"name": "My NFT",
	"symbol": "MNFT",
	"description": "To the moooooonnnn",
	"image": "https://gateway.irys.xyz/737m0bA1kW4BlIJOg_kOGUpHAAI-3Ec9bdo8S_xTFKI",
}
Finally, upload your NFT metadata to Irys and use the URL generated to mint the NFT.
import { Uploader } from "@irys/upload";
import * as fs from "fs";

const uploadMetadata = async () => {
	const irys = await getIrysUploader();

	const fileToUpload = "./metadata.json";
	const tags = [{ name: "Content-Type", value: "application/json" }];

	// Get size of file
	const { size } = await fs.promises.stat(fileToUpload);
	// Get cost to upload "size" bytes
	const price = await irys.getPrice(size);
	console.log(`Uploading ${size} bytes costs ${irys.utils.fromAtomic(price)} ${token}`);
	await irys.fund(price);

	// Upload metadata
	try {
		const response = await irys.uploadFile(fileToUpload, { tags: tags });
		console.log(`File uploaded ==> https://gateway.irys.xyz/${response.id}`);
	} catch (e) {
		console.log("Error uploading file ", e);
	}
};
Alternatively, you can upload using our Storage CLI.
irys upload metadata.json \
  -n devnet \
  -t ethereum \
  -w bf20......c9885307 \
  --tags Content-Type application/json \
  --provider-url https://rpc.sepolia.dev